

Your tags are firing?… Tag Assistant says connected, the container is loaded, every row in the debug panel shows green, and the numbers still do not hold up when someone reviews a report. Google Tag Manager for ecommerce is one layer in a detailed hand-off process, but it can still pass every check while sending the wrong event name, the wrong value, or the same purchase twice. We build and audit these containers for retail brands, and understanding the gap between fired and correct is where most of the work lives.
This post follows the video chapter by chapter, with timestamps. The container in the walkthrough is our own demo store, and every ID, value, and figure on screen is demo data you can see.
Google Tag Manager for Ecommerce, End to End
This is the order we build in: understand what the tool can see, stand the container up, verify it is really there, wire the events, then test and version everything before it reaches production. Skip the verification and you find out from a report instead of a debug panel.
What Google Tag Manager Actually Does (0:39)
Tag Manager puts rules around when and where information gets sent. It is not the analytics tool, and in most cases it is not the JavaScript either. It does not build dashboards, it does not manage your consent policy (though it can apply one), and it does not write to a database.
The path (1:25) runs one direction. Something happens on the site, and that event gets written to a monitored JavaScript variable called the data layer. Tag Manager reads the variable, uses part of it to make decisions, and passes the rest to Analytics, an advertiser, or an email provider, formatted for each from one source. So Tag Manager can only ever see what your site wrote to that variable. Your tracking scope is decided before you open the tool.
Browser Versus Server Side GTM (5:05)
Everything here is the browser-side container, the JavaScript that runs in the visitor’s browser. Server side does two other jobs: it can host the tagging code on your own domain as a first-party script, and it can process events on your server and forward them by calls the browser cannot make. When someone says Google Tag Manager they mean browser side. The other is Google Tag Manager Server, written sGTM in some documentation.
Setting Up A New Account (6:19)
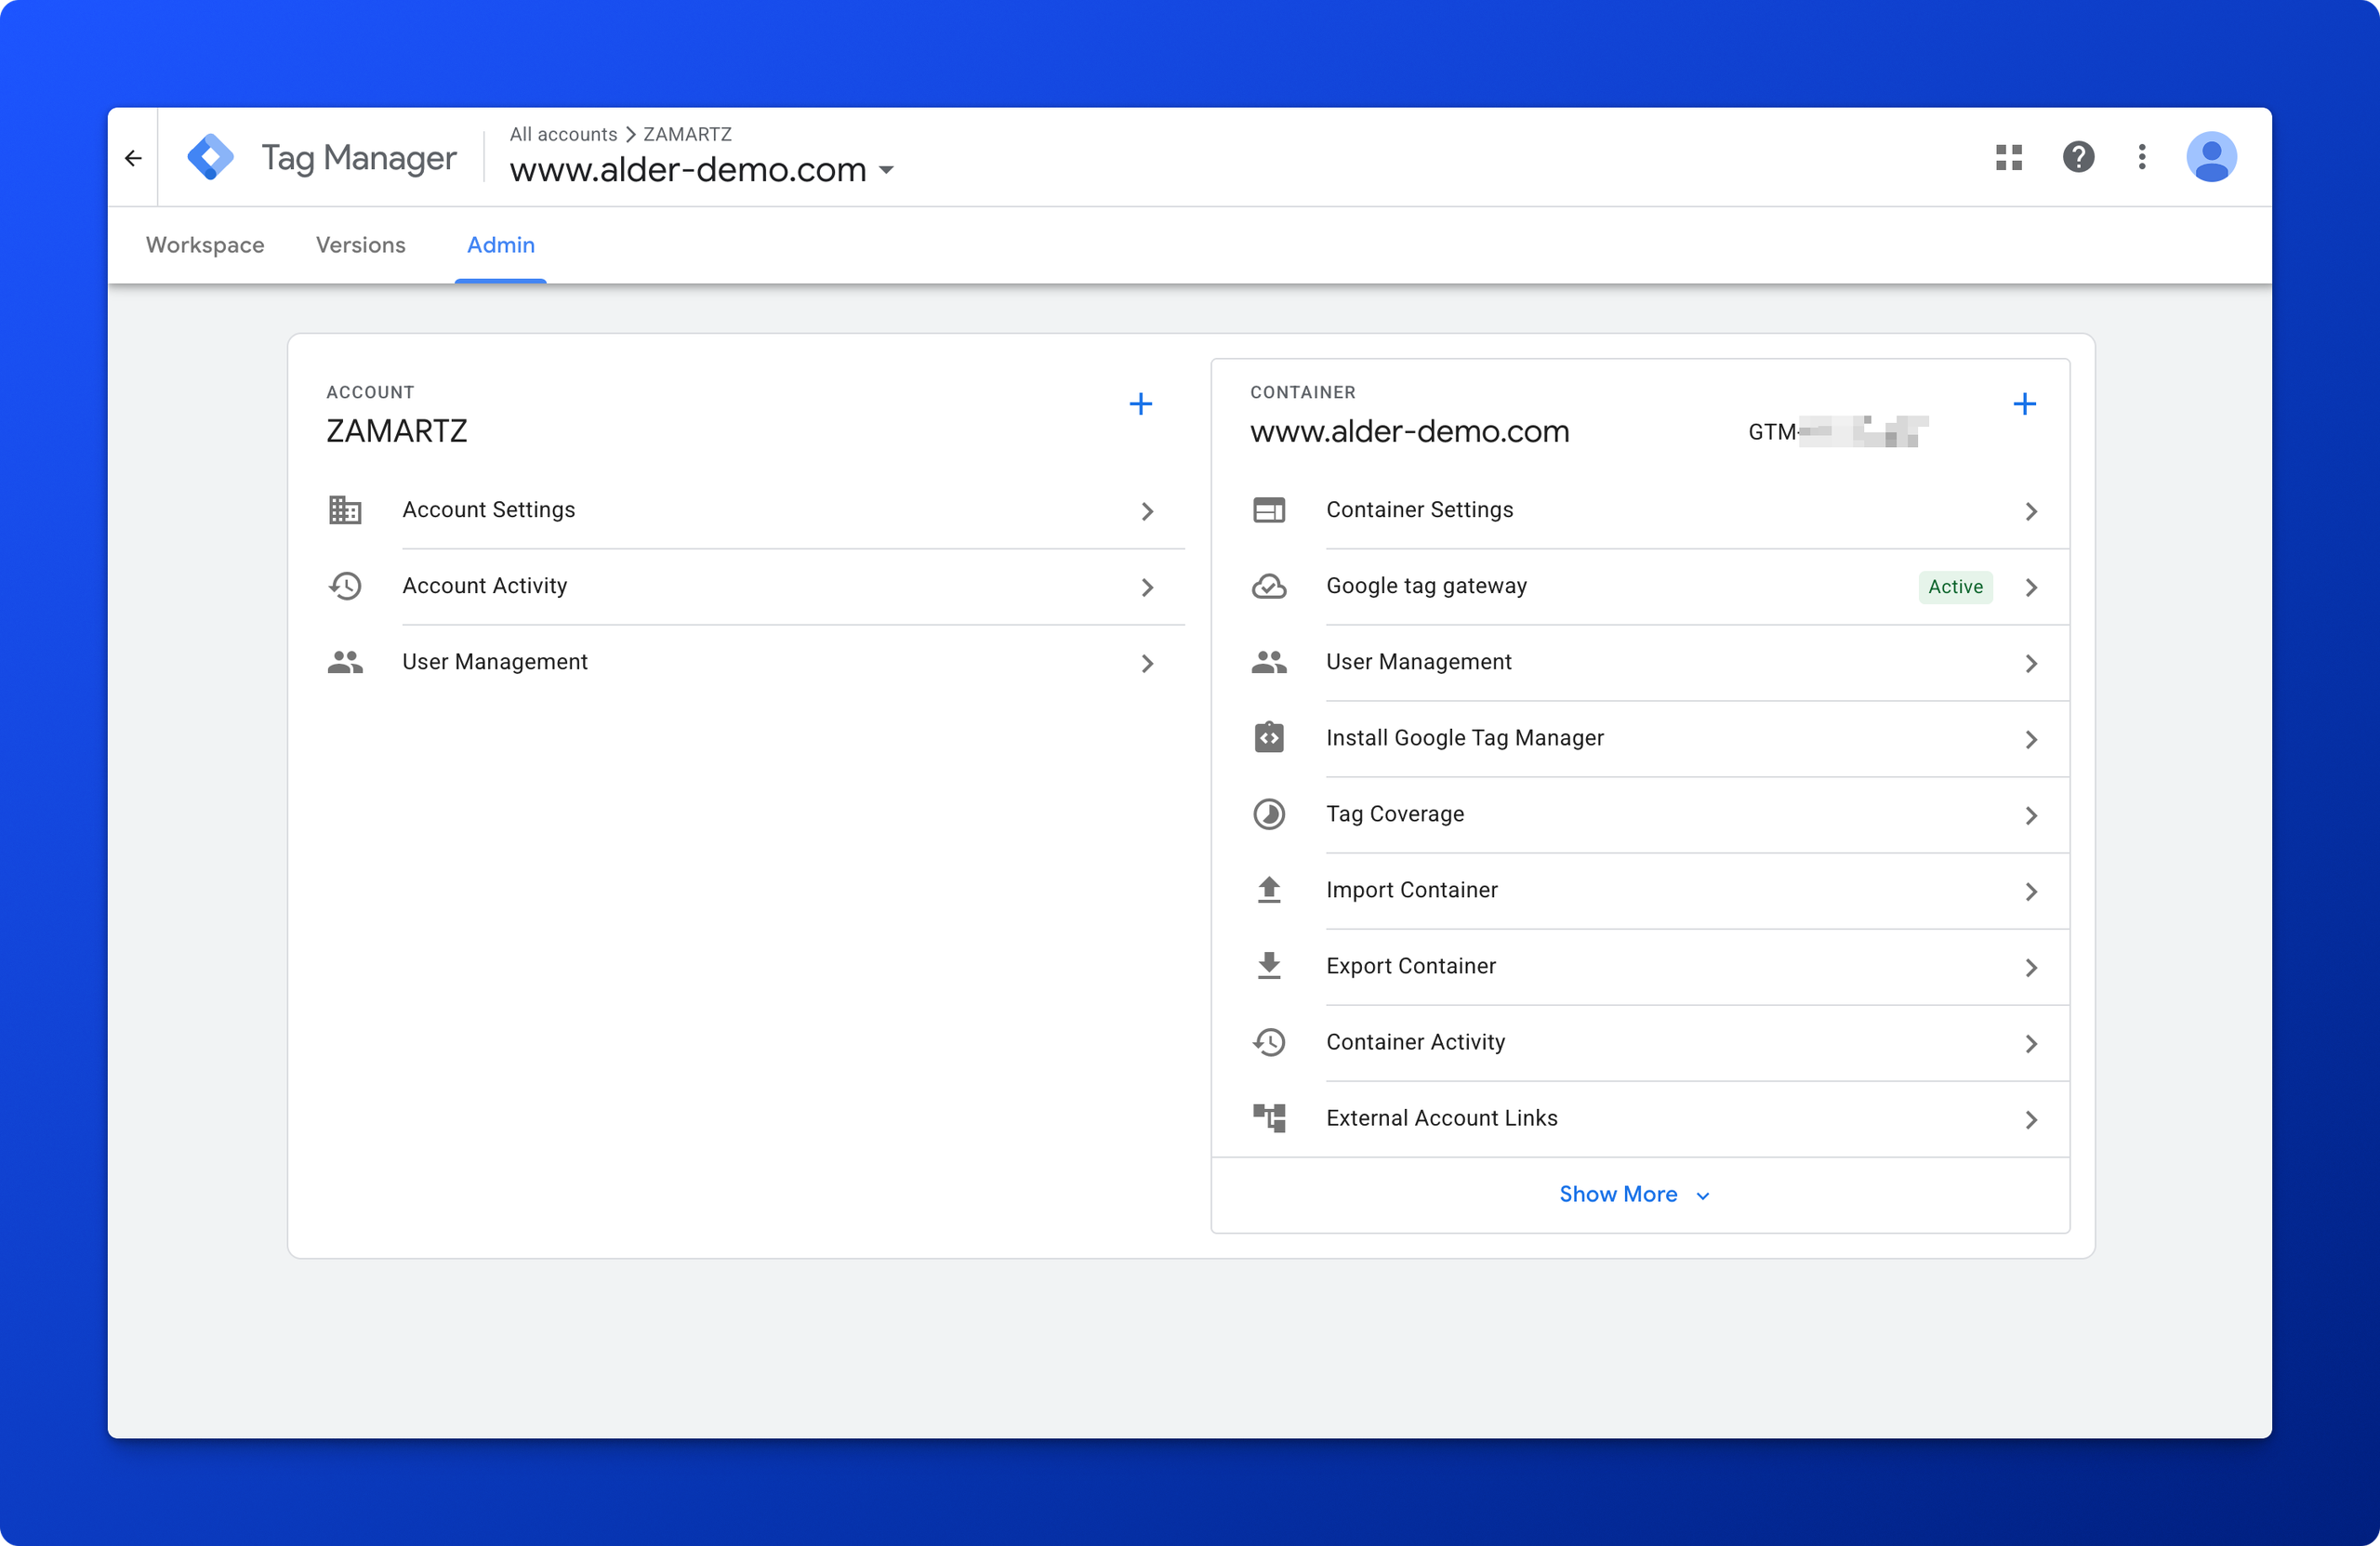
An account holds containers, and a container targets web, an app, iOS, or server. Choose your country deliberately, because that is where your base tag sits in Google’s infrastructure. You land on the default snippet, which is your production code and a slimmer build than the environment-specific versions, so it performs better. There is a head tag and a body iframe, and while the body is technically optional, install both. Lose the snippet later and it is buried under Admin, alongside the approval queue, environments, and your container ID.
Set the permission ladder properly on day one. Editor creates workspaces, which are contained sets of undeployed changes. Approver checks for conflicts before anything goes out. Publisher picks the environment the version ships to, so know where that button points before you press it. Then, before you add a single tag, agree a naming convention: platform, then event, then a detail. GA4, add to cart, quick view. It looks like overhead with four tags, and it is the difference between finding something and rebuilding it once you have forty.
Verifying Your Installation (13:39)
Click preview before you deploy a single tag, because it tells you whether Tag Manager is on the site at all. The handshake needs the Tag Assistant extension in Chrome, and connected means the page and the tool are talking. A second window lists events in the order they happen, whether each fired, the consent values at the time, and failure details.
Three confirmations together mean it is really installed: Tag Assistant connects and shows GTM debug active, the container ID appears in the page source, and the container reports as loaded with a quality reading of excellent. If one is missing you have a deployment problem, and no amount of tag configuration will fix it.
Tags, Triggers And Variables (17:04)
Tags send the data, triggers decide when, variables supply the values. The one worth calling out is the lookup table, which is the most underrated variable in the tool. Our standing use is keeping development traffic out of production reporting: if the hostname contains dev, hand back the development Google Ads property ID, and if it is the www host, hand back the production one. One variable, and staging stops polluting live conversion data. The other is a unique ID variable template, which stamps every event with a random ID and is what makes event deduplication and browser-to-server ID matching possible later.
Building The Add To Cart Event (20:51)
The video builds a bad version first, on purpose. The goal is to capture the color name when someone clicks a swatch, so the trigger fires on all elements where the click classes contain the swatch class, passing the built-in click ID as the label. Preview it and the label comes back empty almost every time, because the selector catches everything in that area and most of what it catches has no ID to read. You can force it with a precise selector or custom JavaScript, and it will break at the next theme update anyway. Out-of-the-box click triggers are fragile. A structured event the site pushes to the data layer is not.
The real build starts with the Google tag, the configuration tag everything else piggybacks on. One base tag now serves Analytics, Ads, and 360, where each used to need its own. Two settings are worth copying from the demo: send page view is false, because a single page application changes the URL without a page load and a dedicated page view event does that job, and client ID is overridden from the data layer.
Then the firing order, which is the part people miss. Consent defaults go first, so a third-party consent provider can relay updates. Initialization is next, for anything that must be settled before other tags run, like an environment decision read off the URL. Container loaded means the container is running, not that everything is ready. DOM ready is where page view events usually sit, and window loaded is last. Open any trigger configuration screen and the list reads in that order.
The GA4 event tag itself is short. Measurement ID, event name, and the setting that does the work, which is send ecommerce data from the data layer. That pulls the items array, the value, and on a purchase the transaction, tax, and shipping fields, so a properly architected data layer leaves nothing else to configure. The trigger is a custom event matching your add to cart event name, narrowed with a quick view class if you need it, with exceptions so a wish list page does not fire it.
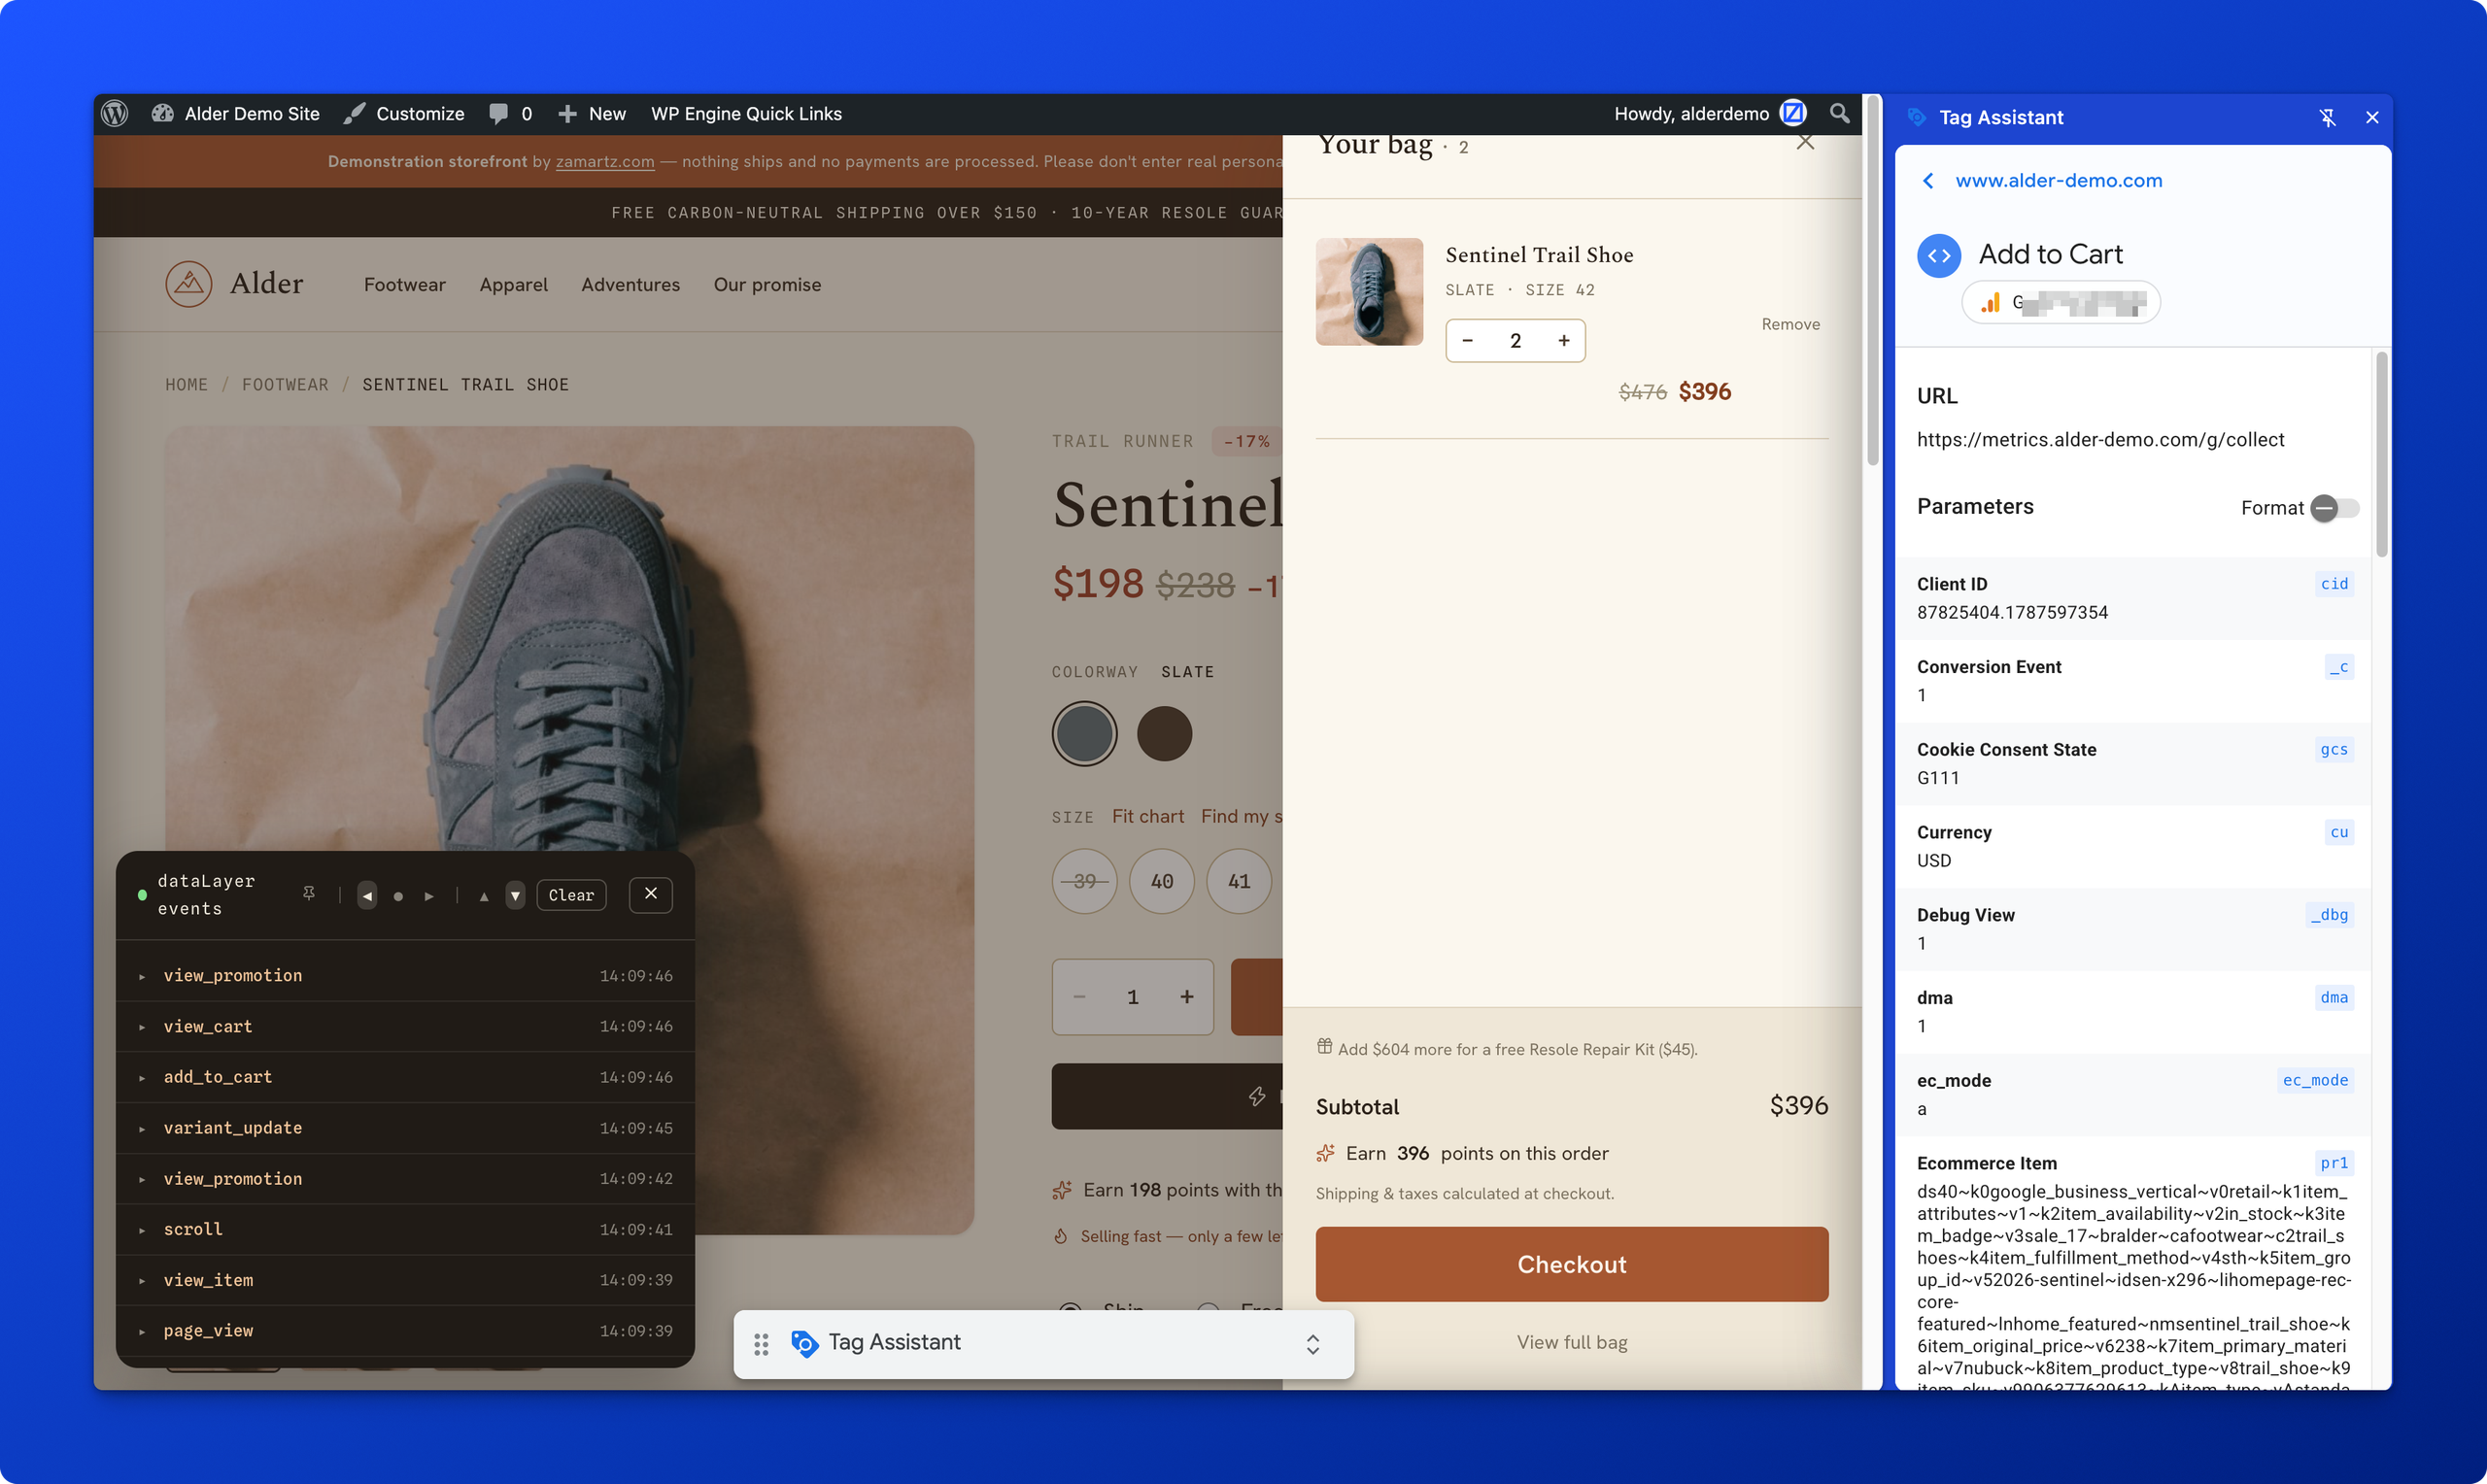
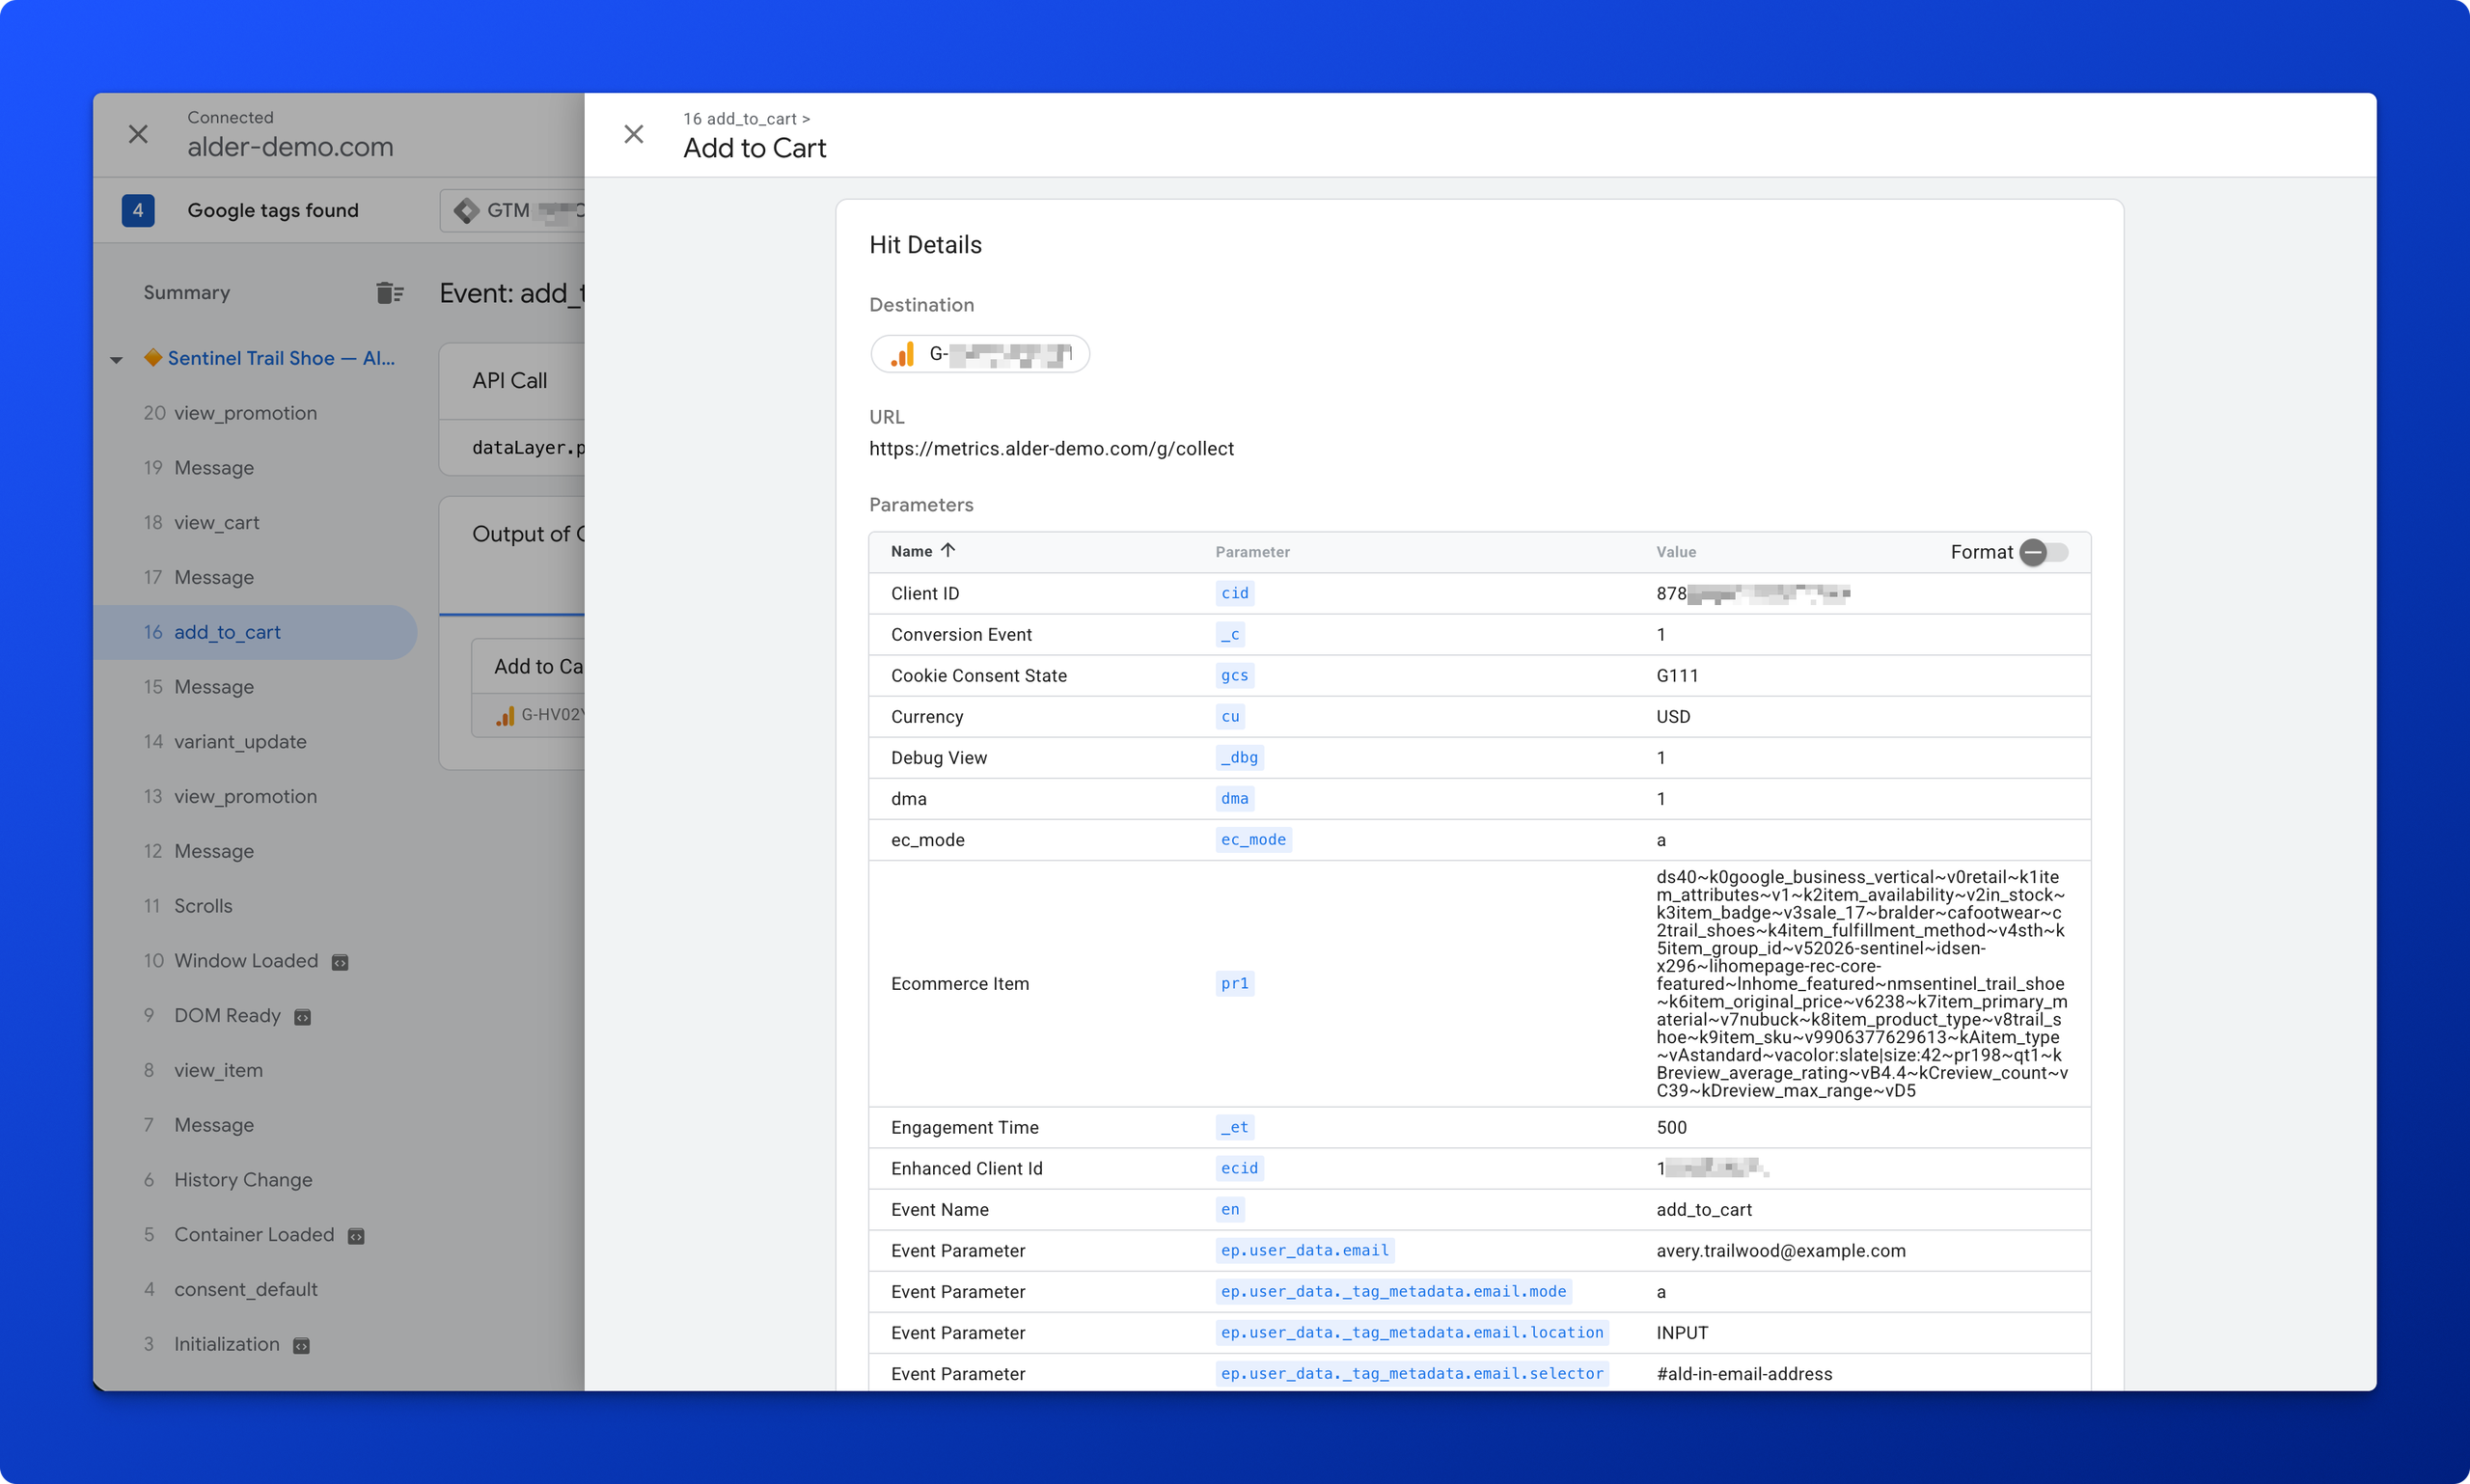
The payload structure decides how much configuration you ever do. At item level the non-negotiables are item ID, price, and quantity, plus the business vertical for Ads retargeting. Two details catch people out. Categories follow a schema quirk where the first has no number and the next are 2, 3, and 4. And the identifier question usually has two answers, because the ID your product feed wants and the ID your analysis wants are rarely the same field. One behavior to design around: GA4 drops null item values, so a blank must not travel as an empty or undefined value, and a field you know will be blank should be left out rather than sent hollow.
Purchase Event Requirements (42:27)
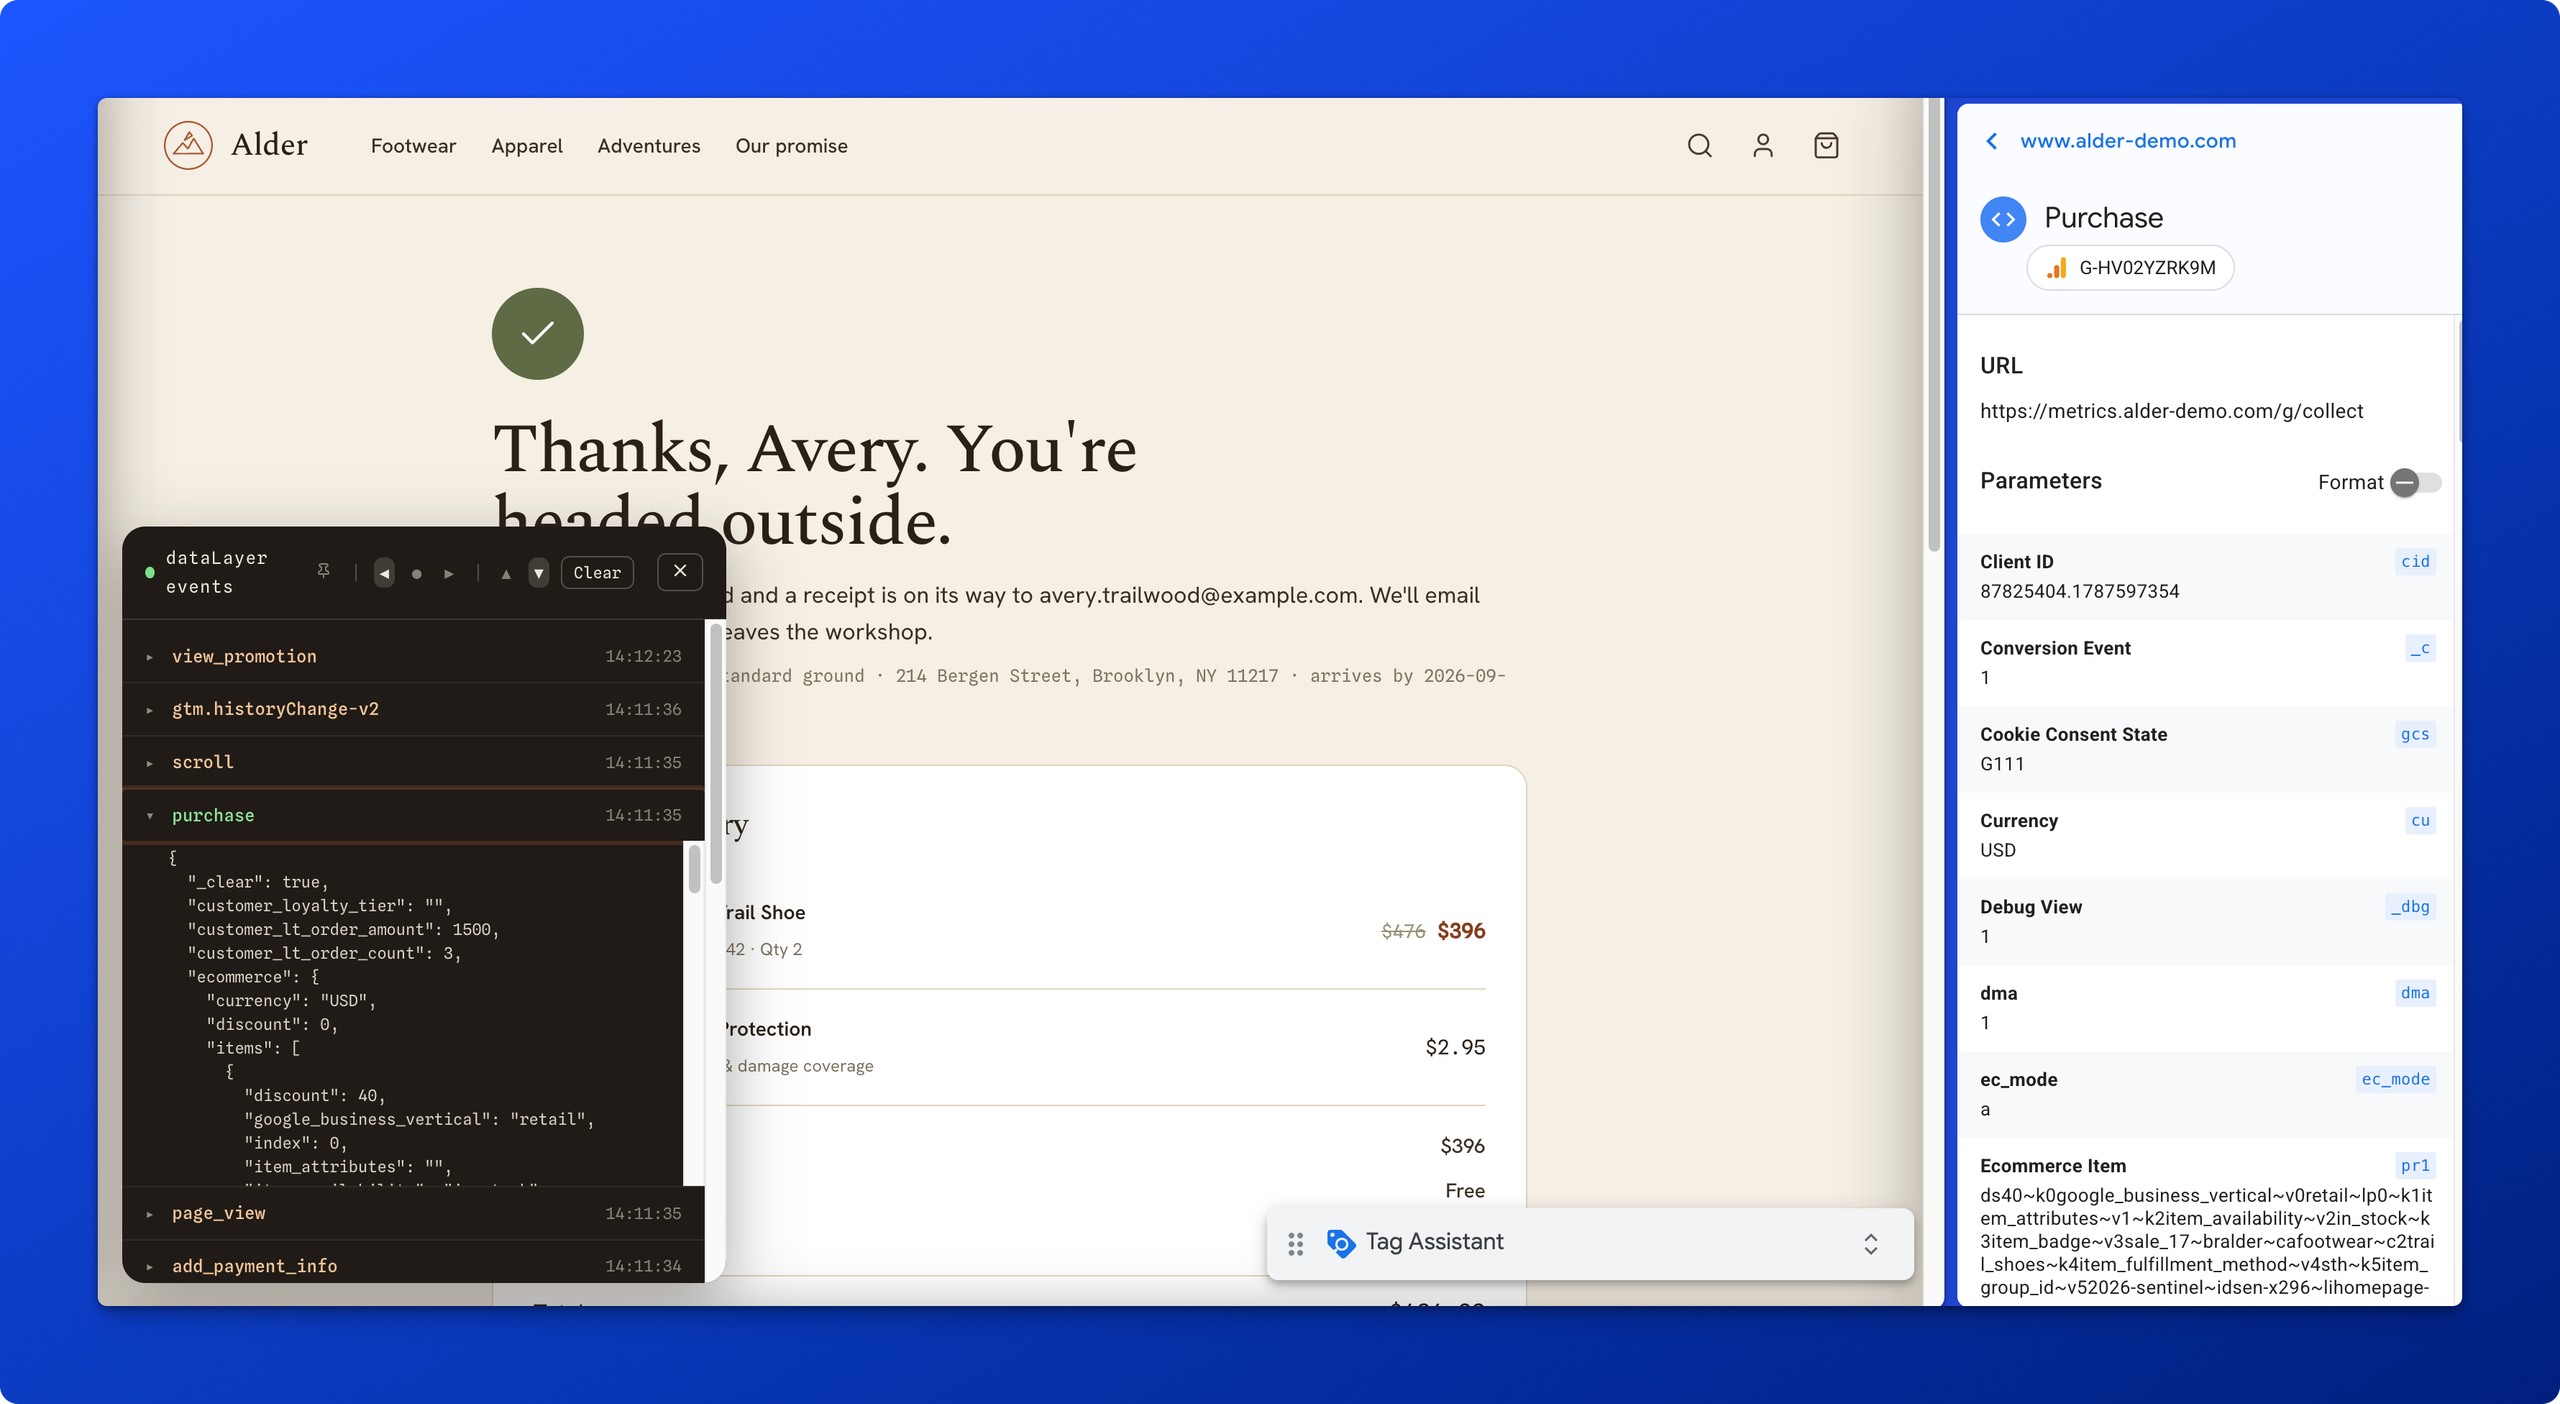
Purchase is the picky one, and it is the event most of your success metrics are built on. Four things are required: currency, value, transaction ID, and at least one item. The item only needs item ID, price, and quantity, so it can be missing everything else and still go through.
Here is the part that explains most missing-revenue tickets. A transaction is anything Google received, malformed or not. A purchase is a transaction that arrived with what it needed. Send a purchase event without the requirements and it registers as a transaction, never becomes a purchase, and nothing tells you why. Nesting is the other half: what belongs in the items array belongs there and not one level up. Tax, shipping, coupon, and discount are optional, and we include them, because they feed standard reports you will want later. When an event does not show up, we check event requirements, then item requirements, then payload size, then the tag.
{
  event: "purchase",
  gtm: {
    uniqueEventId: 36,
    start: 1789409378591,
    historyChangeSource: "pushState",
    oldUrlFragment: "",
    newUrlFragment: "",
    oldHistoryState: null,
    newHistoryState: null,
    oldUrl: "https://alder-demo.com/product/sentinel-trail-shoe",
    newUrl: "https://alder-demo.com/checkout",
    triggers: "15",
    priorityId: 24,
    priorityQueue: [24],
    scrollThreshold: 90,
    scrollUnits: "percent",
    scrollDirection: "vertical"
  },
  ecommerce: {
    currency: "USD",
    discount: 0,
    items: [
      {
        discount: 40,
        google_business_vertical: "retail",
        index: 0,
        item_attributes: "",
        item_availability: "in_stock",
        item_badge: "sale_17",
        item_brand: "alder",
        item_category: "footwear",
        item_category2: "trail_shoes",
        item_fulfillment_method: "sth",
        item_group_id: "2026-sentinel",
        item_id: "sen-x296",
        item_list_id: "homepage-rec-core-featured",
        item_list_name: "home_featured",
        item_name: "sentinel_trail_shoe",
        item_original_price: 238,
        item_primary_material: "nubuck",
        item_product_type: "trail_shoe",
        item_sku: "906377629613",
        item_type: "checkout",
        item_variant: "color:slate|size:42",
        price: 198,
        quantity: 2,
        review_average_rating: 4.4,
        review_count: 39,
        review_max_range: 5
      },
      {
        google_business_vertical: "retail",
        index: 1,
        item_attributes: "",
        item_availability: "in_stock",
        item_badge: "",
        item_brand: "alder",
        item_category: "service",
        item_category2: "shipping_protection",
        item_group_id: "2026-package",
        item_id: "pac-x312",
        item_list_id: "confirmation-direct-core-2026_package",
        item_list_name: "2026-package",
        item_name: "package_protection",
        item_original_price: 2.95,
        item_primary_material: "cotton",
        item_product_type: "shipping_protection",
        item_sku: "819250114276",
        item_type: "checkout",
        price: 2.95,
        quantity: 1
      }
    ],
    order_bopus_store: "",
    order_checkout_type: "standard",
    order_contains_preorder: "false",
    order_fulfillment_method: "shipping_standard",
    order_gift_card_amount: 0,
    order_gift_wrap: false,
    order_location_id: "",
    order_merchandise_total: 396,
    order_payment_type: "creditcard",
    order_payment_vendor: "visa",
    order_ship_type: "ship",
    order_shipping_discount: 0,
    order_shipping_type: "standard",
    order_subtotal: 396,
    shipping: 0,
    tax: 35.14,
    tax_order: 35.14,
    tax_shipping: 0,
    transaction_id: "ALD-K7N0EAS3",
    value: 398.95
  },
  promotion_type: "banner",
  item_group_id: "2026-sentinel",
  item_id: "sen-x296",
  item_name: "sentinel_trail_shoe",
  item_sku: "906377629613",
  item_variant: "color:slate|size:42",
  customer_lt_order_amount: 1500,
  customer_lt_order_count: 3,
  estimated_delivery_date: "2026-09-23",
  loyalty_points_earned: 0
}
By now you are tracking enough fields that nobody holds the definitions in their head, especially where a value changes by event or by whether an order ships to home or gets picked up in store. So build the matrix before you build the tags. Events across the columns, fields down the rows, a sample value in each cell, and a note on what it means. The demo carries two versions of customer email, a plain one and a SHA-256 one, and if that is ambiguous to you it will be ambiguous to the third person who asks. We publish the version we use as a free GTM tag and event matrix template, pre-filled with a demo brand so you see a worked example rather than an empty cell.
Consent Mode In Practice (47:13)
Consent is not only a cookie question, and treating it as one is how teams end up compliant on paper and leaking in practice. A banner blocking cookies does not configure the code. There are cookieless tracking methods that need no cookie at all, and less reputable tools fingerprinting a device from IP and browser characteristics. So consent settings on your tags matter as much as the cookie classifications behind the banner. That is our position, and why we treat cookies and tags as one job.
Google’s own templates carry most of the logic. Take a visitor who declines ad storage and ad personalization but allows analytics: the GA4 to Google Ads connector will not pass that data through, while GA4 still records the add to cart, so you keep the business measurement without the advertising signal. You can also be stricter than the default. Require analytics outright and the tag sends nothing rather than partial information.
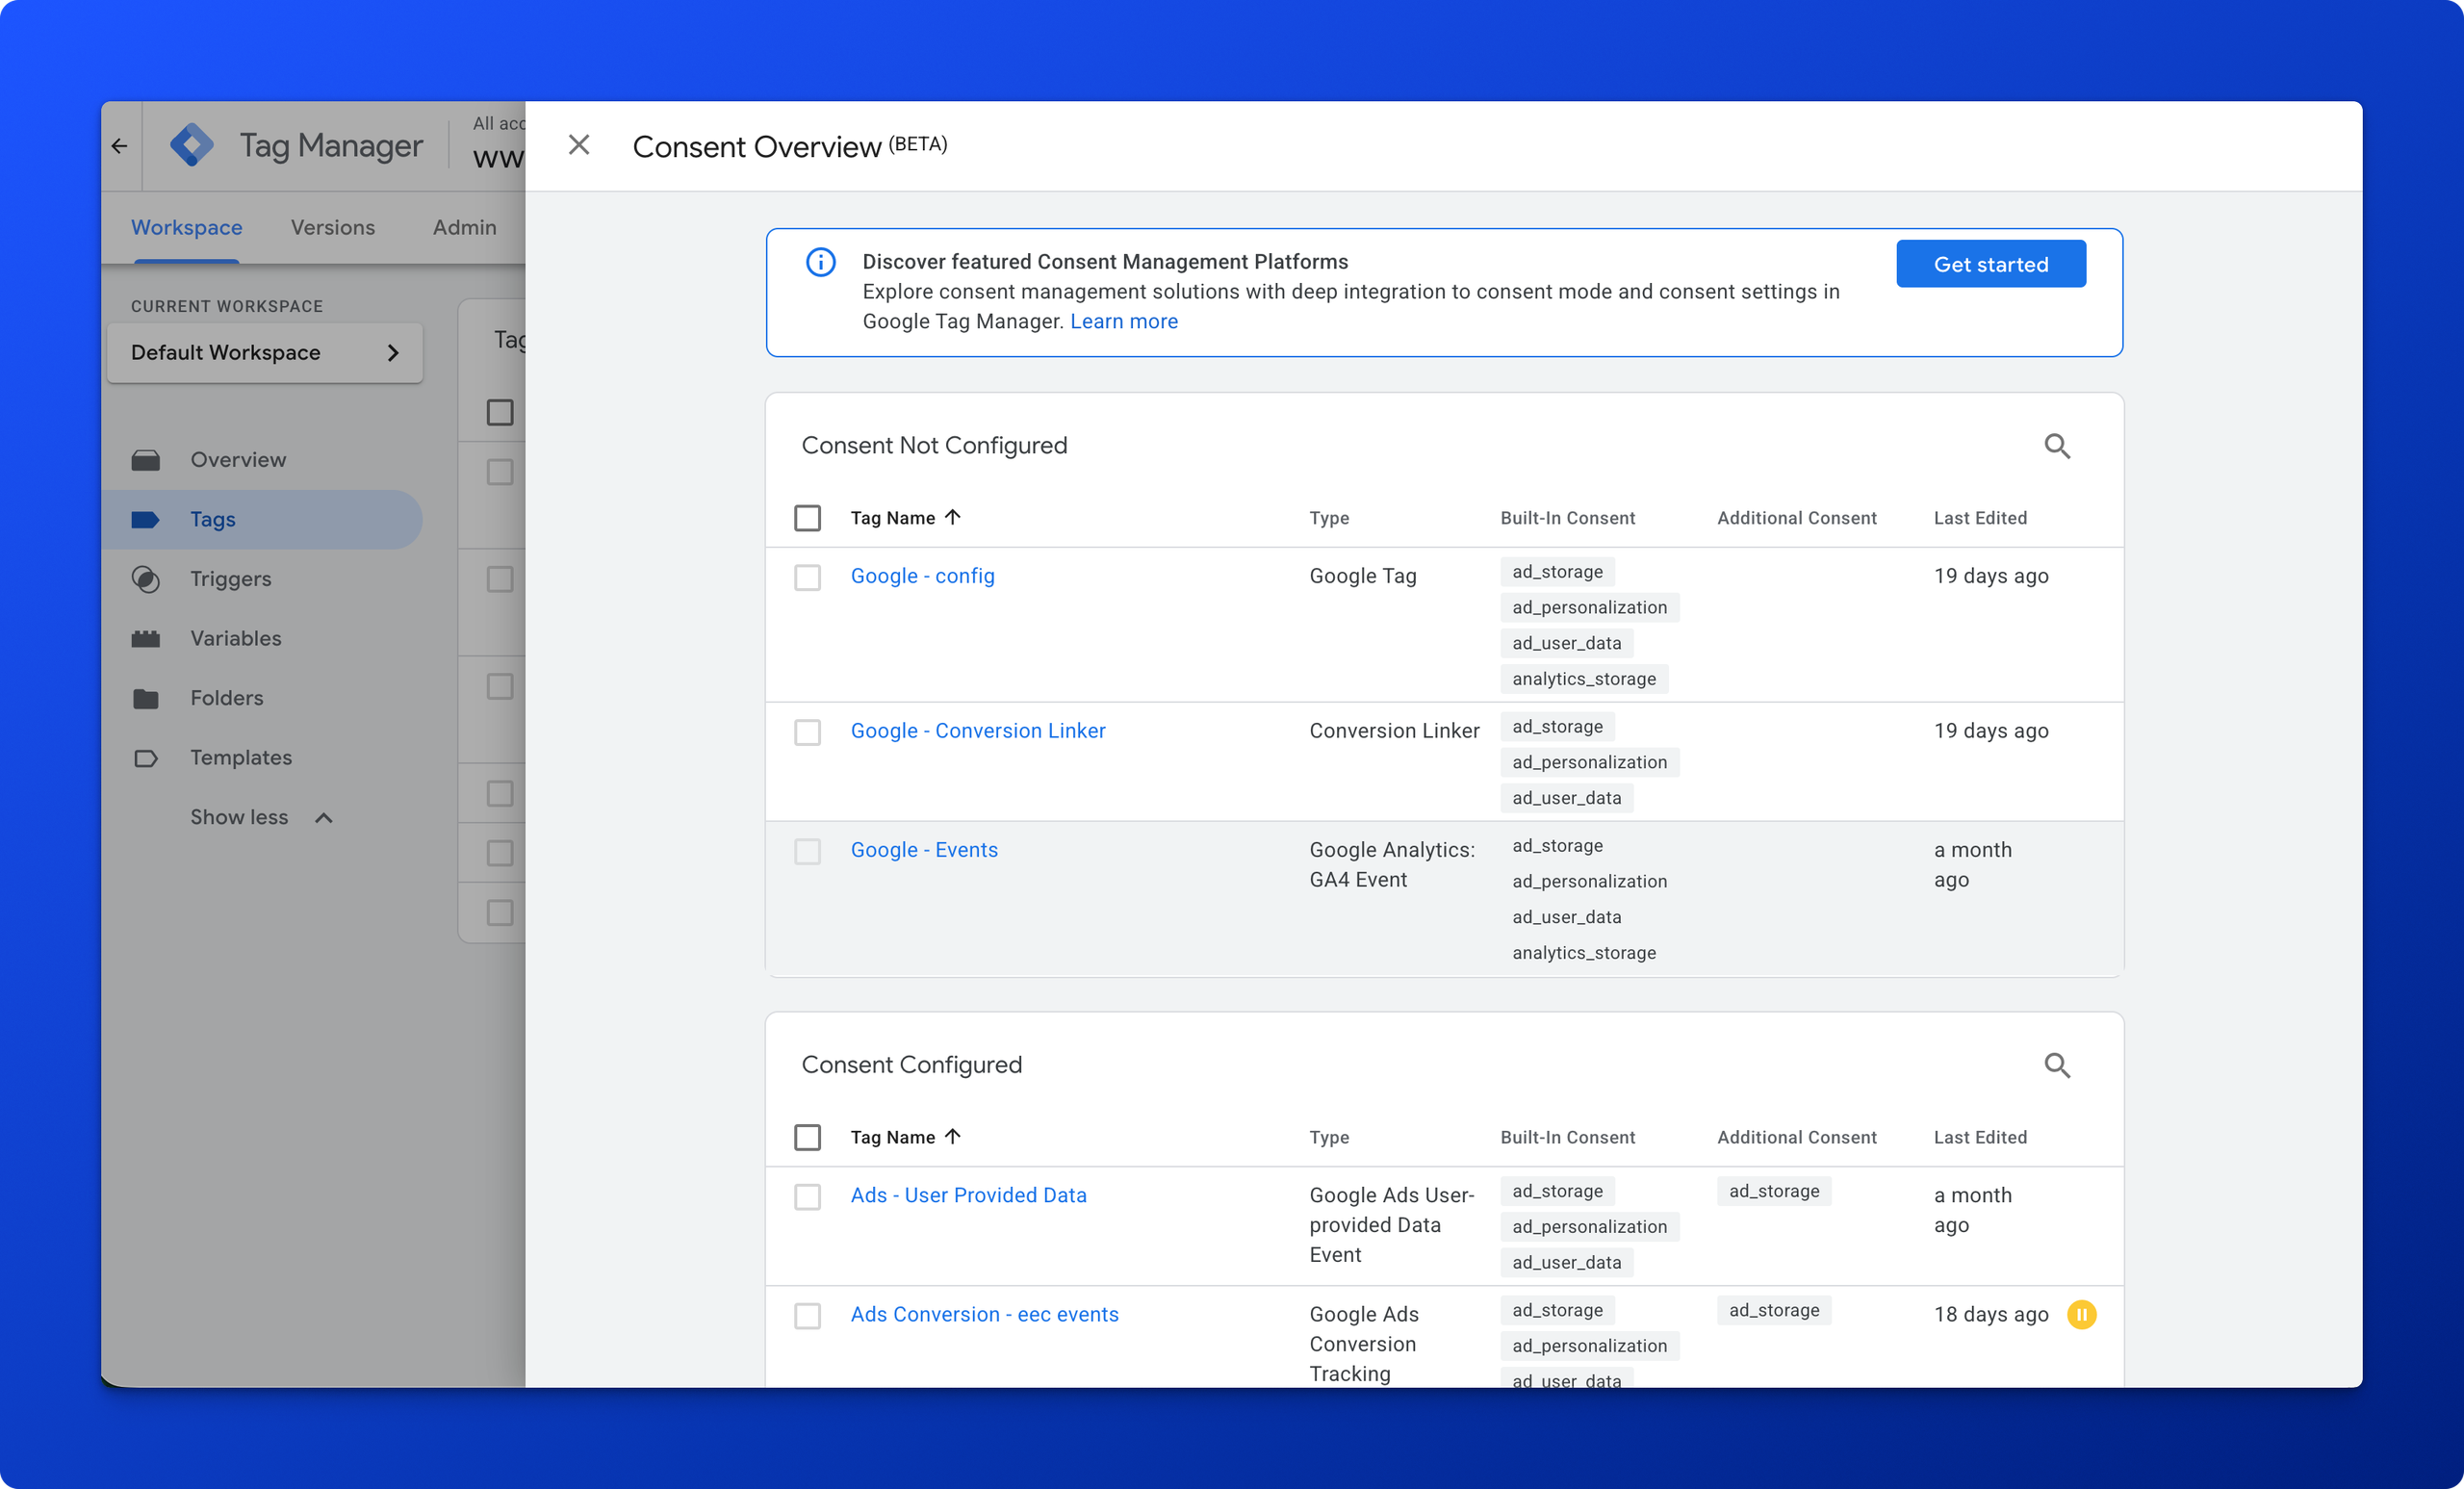
Turn on the consent overview so you see all of it at once, under Admin, then Container Settings, then Additional Settings. It puts a shield on your tags screen showing which tags you configured deliberately and which run on built-in defaults. Templates also exist for the main consent platforms, Osano and OneTrust and Cookiebot among them. We recommend against using them. Install the consent manager directly on the site, because it should be deciding before Tag Manager loads. Through GTM it will work, since the consent check and initialization run first, but direct installation does not depend on load order going your way.
Google Ads Conversions And Linking (52:01)
This is where the container starts feeding Google Ads, and the tag is the same shape as the GA4 one with a shortcut worth stealing: a lookup table maps each event name to its own conversion ID, so a single tag covers five events instead of five tags covering one each. Product-level data flows automatically when your item ID matches the Merchant Center catalog, which is why the identifier decision from earlier keeps coming back.
The rest of this chapter is a subject of its own. Enhanced conversions and the user-provided data variable, the remarketing tag and the user ID that stops you chasing someone who already bought, auto-tagging and the conversion linker that turns Google’s placement gibberish back into reporting you can read. All of it is covered end to end in the follow-up walkthrough on Google Ads conversion tracking, so watch that one next rather than taking a partial version here. If it is channel credit you are chasing rather than tag setup, our older piece on attribution models covers why we favor a data-driven read over last click.
Debugging, Versions And Cleanup (59:58)
The debug view earns a slower read than most people give it. Click any event and you get the tags that fired, the tags that did not, the variables present at that moment, the data layer as it stood, the consent state, and console errors. A tag that did not fire tells you why: in the demo an Ads tag is blocked because ad storage was declined. Some console noise is not a fault, and an invalid ecommerce event name on page view or scroll is the usual example. Not wrong, just not what the tool expected.
Workspaces keep two pieces of work from stepping on each other. A Pinterest tag and a Reddit tag, different teams, one ready before the other. When one gets published the others show as out of date, and updating surfaces the conflicts side by side so you accept the deployed change or keep yours, one at a time. Publishing always names an environment, so know whether you are pushing to development, staging, or live before you confirm.
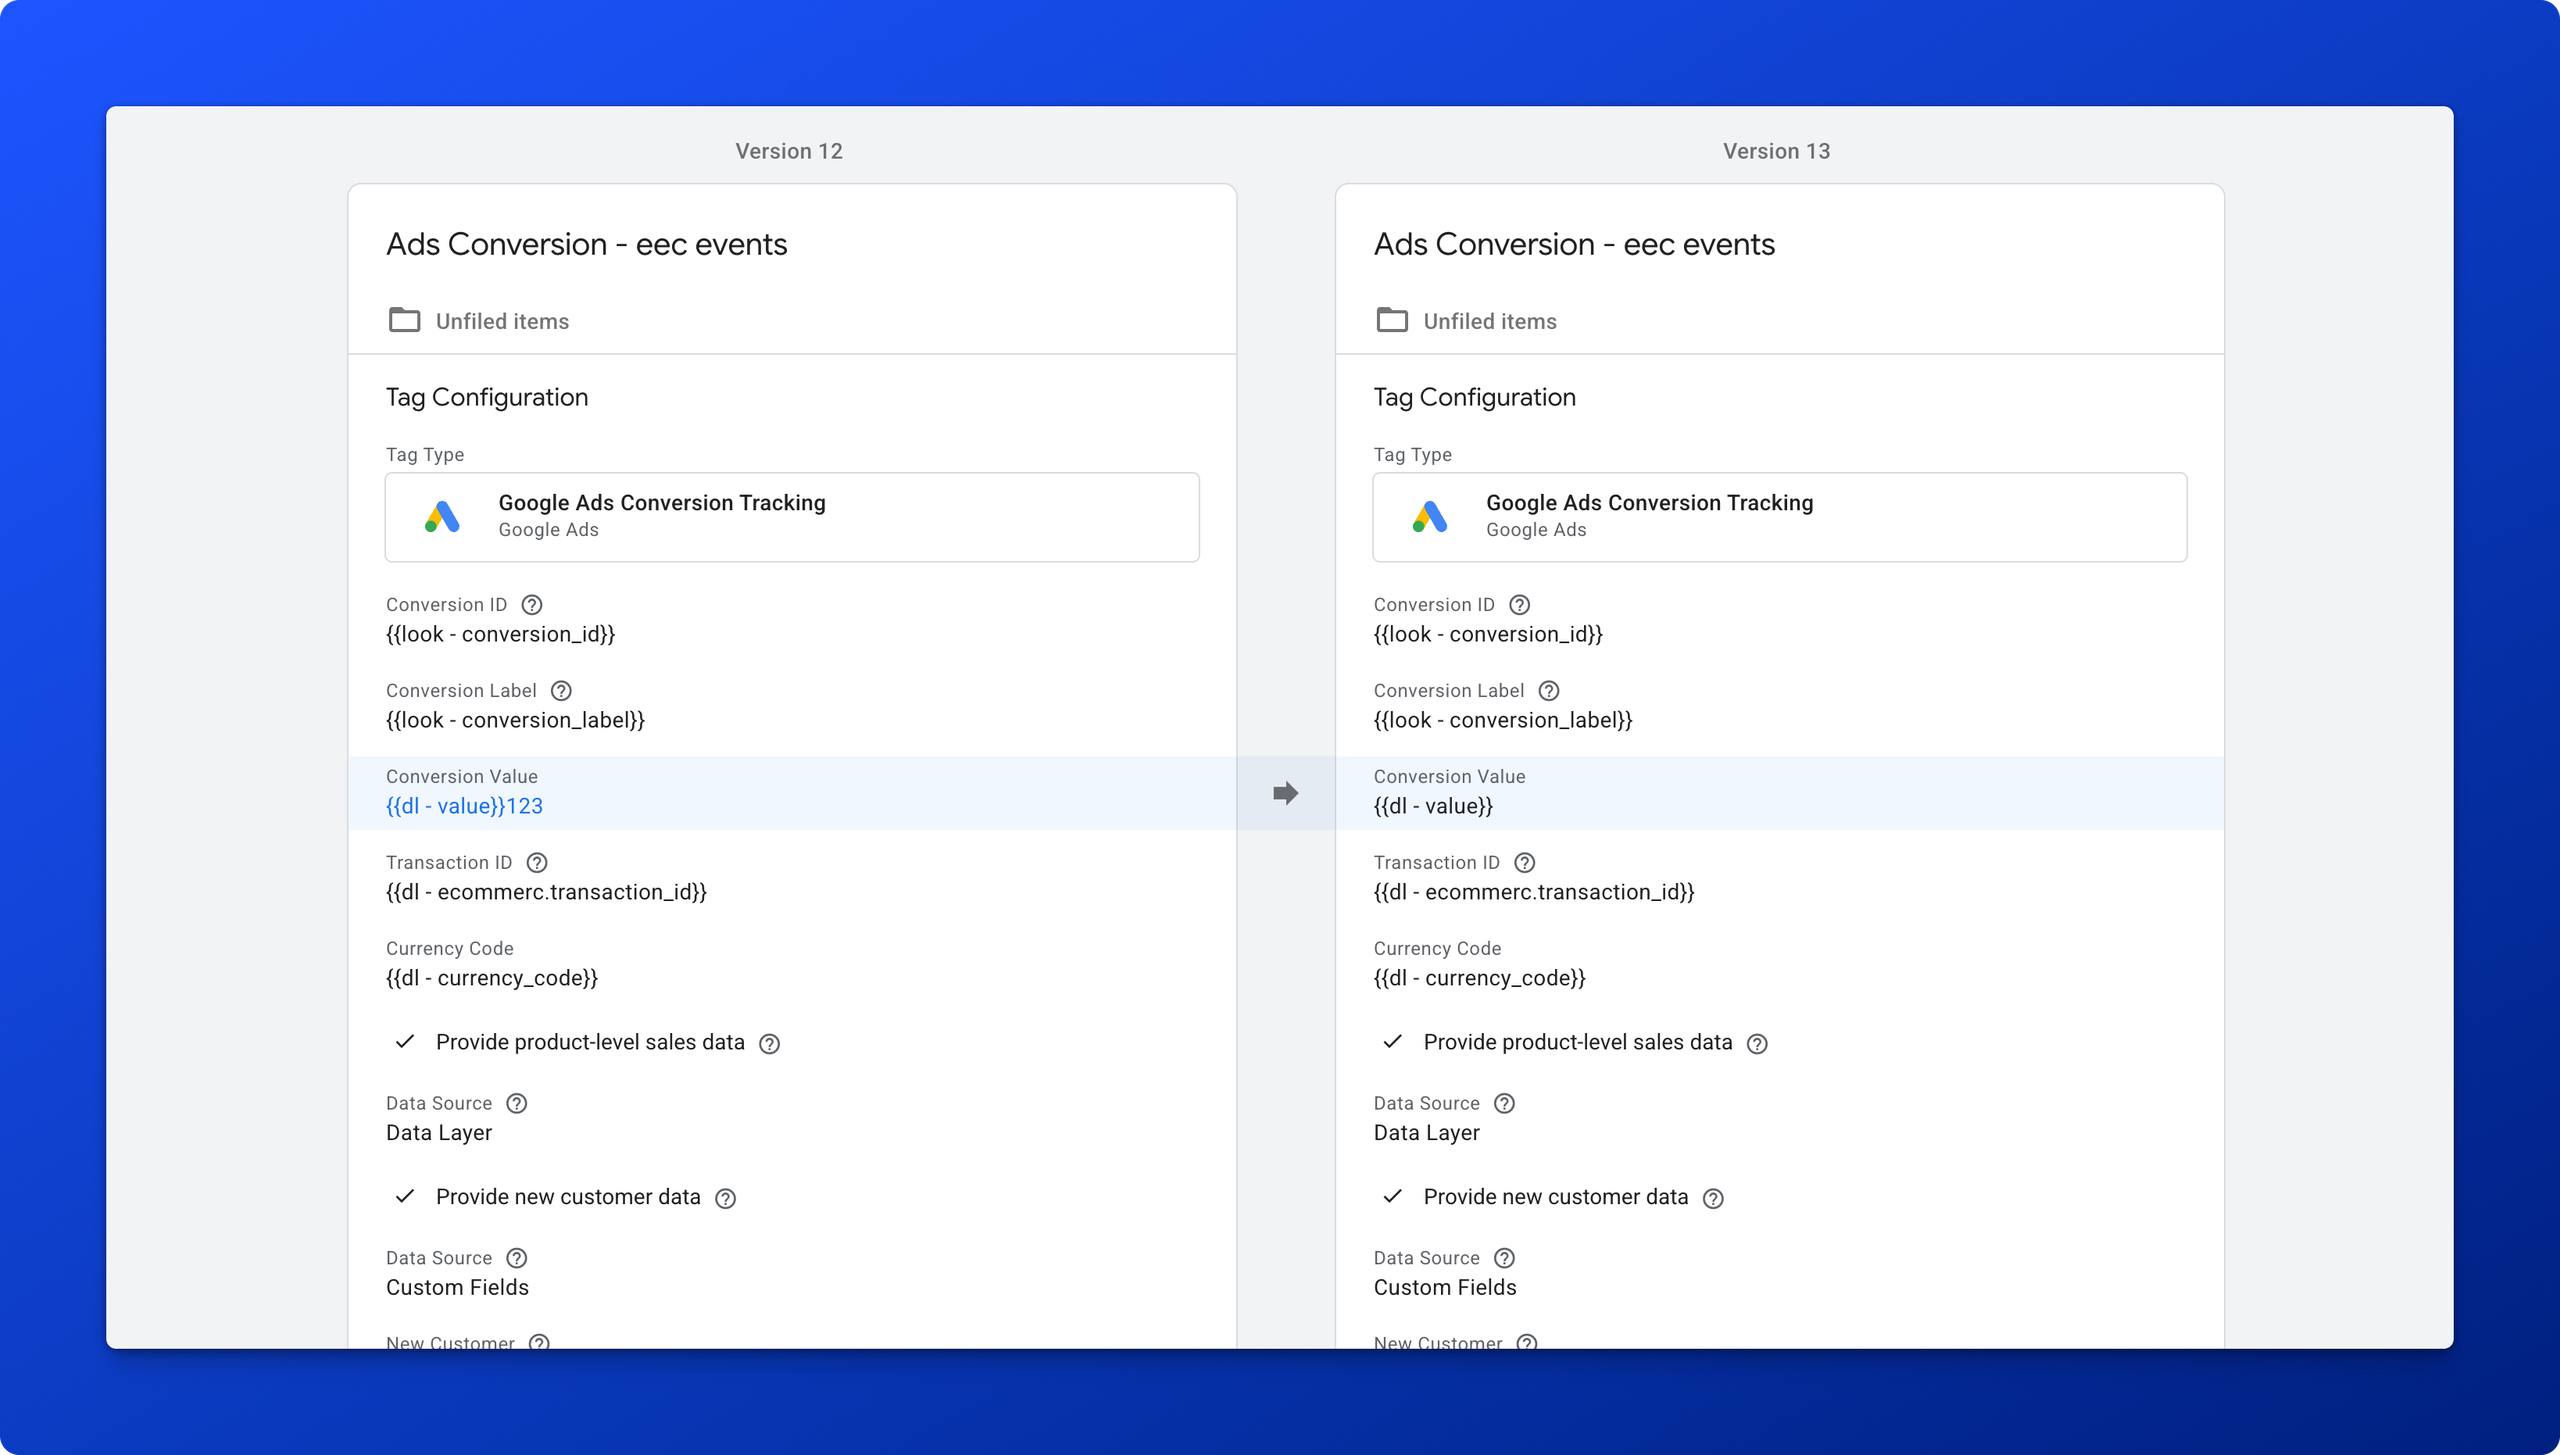
When something ships wrong you do not unpick it by hand. Open the last version you were happy with, choose publish to, and send that point in time to whichever environment needs it, then bring your workspaces up to the restored version so nobody keeps building on what you rolled back. Comparing two versions shows exactly what moved, which is how you answer why did we do this six months from now.
Inherited containers are their own project. Take inventory first: what each tag does, which event fires it, whether that trigger is reproducible. That is the same matrix used as an audit instead of a spec, and it doubles as the bug list you hand your developers. Then look at weight, because custom templates and custom JavaScript are the heavy items and a container has a finite capacity. Hit one hundred percent and Google stops letting you add anything. Before deleting a variable, click it and see which tags use it, and pause a tag to watch what happens without it first.
Sort everything into keep, repair, consolidate, or retire, then schedule the changes rather than doing them in an afternoon. Our own practice: wait about forty-eight hours after a change, because GA4 processing and other tools need enough data to surface an error, and make no more than three changes a week. Every release goes out with monitoring, a report to check, a rollback plan, and a named person to call.
The Container You Inherited Is The Hard Part
Everything above is copyable, and you should copy it. A fresh container built in this order, with a naming convention and a matrix behind it, will be cleaner than most containers running on live stores right now. We know that because the demo was built by people who already knew how it should end up, which is not the situation anybody inherits.
What you usually walk into is tags nobody owns, triggers nobody can reproduce, custom JavaScript written for a site that has been redesigned twice since, consent half configured on the tags that matter, and a container quietly filling up. None of that raises an error. It shows up as a report someone stopped opening, and by the time anyone says so out loud, the decisions made on those numbers are already a quarter old.
That part is what we audit. We trace the real data layer, the consent state, and the conversion paths on your store, sort what is there into keep, repair, consolidate, and retire, work with your dev team on the fixes, and put a release process around it. A dashboard is only ever as honest as the data underneath it, and the data layer is only ever as honest as what somebody told the container to watch.
Once collection is sound, the next questions are what to do with it. We cover reading the reports in Google Analytics for ecommerce, putting the numbers where people will read them in copy this ecommerce reporting dashboard, and the build itself in the Shopify executive dashboard.
FAQs
A: Because a transaction and a purchase are not the same thing. GA4 accepts anything it receives as a transaction, malformed or not, but it only registers a purchase when the event carries currency, value, a transaction ID, and at least one item with an item ID, price, and quantity. Miss one and the event lands without ever becoming a purchase, and nothing warns you. Check event requirements first, then item requirements, then payload size.
A: You can, and templates exist for Osano, OneTrust, Cookiebot and the other main platforms. We recommend installing it directly on the site instead, because your consent manager should be deciding before Tag Manager loads. Through GTM it still works, since the consent check runs first, but you are depending on load order rather than removing the question. That is our preference, not a platform rule.
A: Usually because the selector is wider than the thing you meant to catch, and most of what it catches has no usable ID to read. A click trigger set on all elements where the class contains a swatch class fires on the whitespace around the swatch as happily as on the swatch, and the label comes back empty. A precise selector or custom JavaScript can force it, and it stays fragile through theme changes. A structured event pushed to the data layer is the version that survives.
A: Open your version history, find the last version you were happy with, and use publish to, choosing the environment you need to fix. That republishes that point in time instead of asking you to reverse changes by hand, and you can send it to development and live separately. Afterwards, update your open workspaces to the restored version so nobody keeps building on what you rolled back.
A: Browser-side GTM is the JavaScript container that runs in your visitor’s browser, reads the data layer, and sends data out from there. Server-side GTM can host the tagging code on your own domain as a first-party script, and can receive and process events on your server, then forward them by calls the browser cannot make. When people say Google Tag Manager they mean the browser container. The other is written GTM Server or sGTM.
Sources and Further Reading
- Watch the full walkthrough on YouTube: Google Tag Manager for ecommerce
- The follow-up walkthrough on YouTube: Google Ads conversion tracking, which picks up where this one ends
- Tag Assistant Chrome extension, required for the preview handshake
- Tag Manager consent mode support (Google documentation), including how to enable the consent overview
- zamartz: Free GTM Tag and Event Matrix (GA4 spec template)
- zamartz: Google Analytics for Ecommerce, The Reports That Drive Decisions
- zamartz: Copy This Ecommerce Reporting Dashboard, But Audit Your Data First
- zamartz: Build a Shopify Executive Dashboard in Data Studio
- zamartz: Digital Marketing Channel Interaction Attribution Models
Leave a Reply
You must be logged in to post a comment.